Introduction
Thank you for using AnkiDroid, the Android client for the popular Anki spaced repetition system.
Anki is spaced repetition technique which is simple but highly effective. It helps you memorize things by automatically repeating them across increasing intervals based on your responses with no need for you to keep track of what to study or when to study it. You create notes (or download shared decks) with content you need to memorize, and the scheduler will make sure you see the content when you need to.
AnkiDroid is intended to be used in conjunction with Anki on your computer. While it is possible to function without it, some tasks are either only possible with, or a lot more efficient with Anki Desktop. Furthermore, it is strongly recommended to at least read "Key Concepts" section of the main Anki manual to understand the terminology used here.
If this manual doesn’t contain what you are looking for, please check the AnkiDroid Wiki for a list of changes, instructions for submitting bug reports and feature requests, a list of frequently asked questions, and much more.
Getting started
To start using AnkiDroid, we need to add some cards to study. From the main screen, tapping the big blue plus button will allow you to either add a new "note" (i.e. create new flashcards), download shared decks (decks that other people have created and shared online), or create new empty decks.
Please watch this 5 minute tutorial video, which gives an introduction to adding, downloading, and studying cards in AnkiDroid. More detailed information can be found in the sections below.
If you are an existing user of Anki Desktop wishing to import your decks from the computer, you might like to skip straight to the using AnkiDroid with Anki Desktop section.
The Deck List
Note: This section onwards assumes you understand what decks and cards are
The deck list is the screen you see when you start AnkiDroid. It displays a list of the decks which contain all of your flashcards, and allows you to perform various actions:

Add button
The big blue + button in the bottom right corner is used to add new material to AnkiDroid. Pressing it expands to give the following four options, which are also described in the tutorial video (except for 'Create filtered deck').
- Add
-
Choose this option if you want to create your own flashcards (notes) with AnkiDroid. "Notes" and "cards" have specific meanings in Anki, which are explained in the main Anki manual. Please see the tutorial video for a quick introduction to adding notes, or refer to the adding notes section below for more detailed information.
- Create deck
-
To create a new empty deck:
-
Tap the + button and choose Create deck.
-
Choose a name for the deck, for example "New Japanese".
-
Add cards to it following the "Add" instructions above.
-
- Create filtered deck
-
To create a filtered deck (i.e. a temporary deck that gathers cards based on a criteria you set):
-
Tap the + button and choose Create filtered deck.
-
Choose a name for the deck.
-
Set the criteria and other options (e.g. limit on the number of cards).
-
- Get shared decks
-
To download a deck of cards from the internet that another user has contributed:
-
Ensure you’re connected to the internet.
-
Tap the + button and then Get shared decks. AnkiWeb will open.
-
Select a category, or type in a search.
-
Tap Info on a deck you’d like to study.
-
Scroll down and tap Download.
-
You browser will download the file and display a "download complete" notification. Tap this button.
-
AnkiDroid will appear, and show a confirmation dialog. Tap the Add button.
-
When the import completes, your deck should be ready to study.
-
App Bar
At the top of each screen in AnkiDroid is the App Bar, with buttons for performing various actions. The following actions are available from the app bar in the deck list:
- Navigation menu button
-
Tapping the icon on the far left will show the left navigation menu for quickly navigating between the main parts of the app.
- Sync button
-
The circular button with arrows on the right is for synchronizing your cards with the cloud, as described in the adding decks from cloud section.
- Overflow menu button
-
On the far right is the overflow menu which contains less commonly used actions. These actions are described further below.
Hint: long tapping on a button in the app bar anywhere in the app will display a textual hint describing what the button does!
Studying a Deck
To study the cards in a deck, simply tap on the deck name (or the "STUDY" button on a 10" tablet), and AnkiDroid will switch to study mode.
Note that the currently selected deck is highlighted with a grey background, and if you have any filtered decks they will be highlighted using a blue font. Filtered decks are discussed elsewhere in the manual.
Other Deck Actions
Long tapping on a deck will show a list of other actions available to perform on that deck:
- Add
-
Adds a new note to the selected deck
- Browse cards
-
Views all cards of the deck in the card browser
- Rename deck
-
Renames the selected deck
|
Note
|
You can create a subdeck in the selected deck, and also can make the selected deck a subdeck of another deck, by using the following naming convention: "PARENT::CHILD" (i.e. "French::Idiom"). For more information, please see the section in Anki manual. |
- Create subdeck
-
Use this option to make a subdeck of the selected deck
- Deck options
-
Configures various deck specific study options. Please see the desktop documentation for more information about these study options.
- Custom study
-
Allows you to choose from some convenient presets for studying outside of your normal schedule, for example increasing the study limit for the day. See the section on "filtered decks" for more detailed information.
- Export deck
-
This option can be used to share a deck with other users. See the exporting decks section for more information.
- Create shortcut
-
Adds a shortcut to study the deck to the Android home screen
- Edit description
-
Creates or edits text shown on the deck’s deck overview screen
- Delete deck
-
Deletes the selected deck. (You can undo this action in the popup message shown after the action, or in the screen menu.)
- Unbury
-
This option is only visble when the selected deck has cards that have been manually or automatically buried.
- Rebuild / Empty
-
If the selected deck is a filtered deck then you also have the option to rebuild or empty the cards in it.
Clickable areas on the decks
Each deck in the list has three clickable areas:
- Deck expander
-
If you are using subdecks, then a deck expander button may appear on the far left of the deck, which can be used to show / hide the subdecks. A ▶ icon means the deck has hidden subdecks which can be shown, a ▼ icon means the deck has visible subdecks that can be hidden, and no icon means that the deck has no subdecks. Note: subdecks can be created by using the naming convention "PARENT::CHILD".
- Deck name
-
This is the main clickable area, which will take you to the study screen if there are cards available to review.
- Count buttons
-
The count buttons on the far right of each deck act as a separate clickable area that takes you to the deck overview instead of the study screen. This can be useful if you want to quickly view the number of cards available in the deck.
Advanced Actions
Some additional actions are located in the overflow menu for less common tasks, which are summarized below:
- Undo
-
After reviewing the last card in a study session, you can undo it from here.
- Check database
-
This can automatically fix a lot of problems with your database, and will also purge any unused tags. If you experience any problems with your collection, this is the first action you should try.
|
Note
|
Under some circumstances, check database will move cards to a deck named !Recovered Cards. If this occurs, please move the cards to an appropriate deck via the card browser, and delete !Recovered Cards when it is empty. |
- Check media
-
Try to run this if you experience any issues with media syncing.
- Empty cards
-
Remove any empty cards from your collection. See the desktop documentation for more.
- Restore from backup
-
Allows you to restore from one of AnkiDroid’s automatic backups
- Manage note types
-
Allows you to add, edit, and delete note types. See the customizing card layout section for more help with this advanced feature.
- Import
-
Import a .apkg anki file containing a deck. See the importing section for more.
- Export collection
-
Export entire collection as a collection.apkg file. See the exporting section for more.
Deck Counts
Next to each deck, three numbers are displayed. The left, blue number, corresponds to how many new cards you have to learn today. Anki will introduce 20 new cards a day by default, and you can customize this number if you’d like. The red number in the middle is for the cards due to be studied today which are currently in the learning phase, and the green number is the cards which are due for review (i.e. cards which have already graduated from the learning phase). On a deck you’ve never studied before, these numbers will both be zero.
As explained above, tapping on the counts will take you to the deck overview screen.
Navigation Drawer
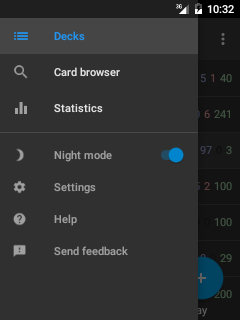
The navigation drawer can be opened from most places in the application by pressing the left menu icon, or alternatively swiping outwards from anywhere on the far left side of the screen. It is used for quickly navigating between different parts of the application. You can switch to the following screens:
- Decks
-
Takes you to the top level of the app where the list of cards are shown (more info here)
- Card Browser
-
Shows a list of all your cards (more info here)
- Statistics
-
Helps you track your study progress (more info in Anki manual and here)
- Settings
-
Allows you to customize the app (more info here)
- Help
-
Opens this web page
- Send feedback
-
Get support from the AnkiDroid team
Deck Overview Screen
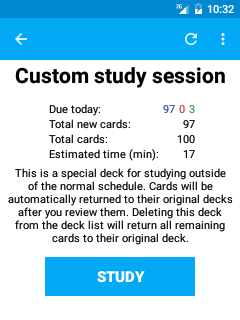
From the deck list, if you tap the counts area you will be taken to the deck overview screen. On tablets it is always shown in the area to the right of the deck list.
On this screen you can view a summary of the deck, build custom study sessions, rebuild / empty filtered decks, and change deck options. When visible, pressing the study button will take you to the study screen for that deck.
App bar
The icons that are shown in the app bar depend on whether your deck is an ordinary deck or a filtered deck.
Ordinary decks
- Custom Study
-
Tapping the wrench icon allows you to create a custom session, for example to do extra reviews outside your normal schedule, or study only certain cards inside a deck. See the filtered deck section for more information on this.
Filtered decks
- Empty deck
-
Tapping the cross icon will empty all of the cards in the current filtered deck (i.e. return them to their original deck).
- Rebuild deck
-
Tapping the rebuild icon will rebuild the current filtered deck according to the settings specified in filtered deck options.
Overflow menu
- Deck Options
-
Allows you to configure some options related to the current deck, such as the number of new cards and reviews to introduce each day. Please see the desktop documentation for more information about these study options.
- Unbury
-
This option is only visble when the selected deck has cards that have been manually or automatically buried.
Study Screen
Tapping on the deck name from the deck list, or the study button from the deck overview screen will take you to the study screen where you do your study.
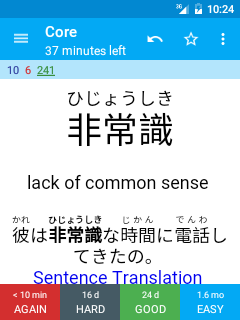
Basics
If you have not used Anki on a computer before, you may like to have a look at the first intro video before reading on, as it explains the basic review process.
On the top left of the screen you’ll see three numbers. From the left, these correspond to new cards, learning cards, and cards to review. These are explained in more detail in the intro videos for the desktop program, so please check them out if you haven’t already.
When you’ve looked at a card’s question and remembered the answer, or decided you don’t know it, tap the show answer button. When you do, the bottom area will change to display 2-4 answer buttons, depending on how you’ve answered the card previously. The buttons will display the time a card will next be shown, so 10m means "10 minutes" and "5d" means "5 days". You can tap directly on these buttons to choose a particular answer.
To make reviewing faster, you can configure gestures (for example taps and swipes) to answer cards without using the buttons. See the preferences section for more information on configuring gestures.
App Bar
The App Bar at the top of the study screen has several buttons for performing various common actions. The number of buttons which are shown is determined automatically by Android based on the size and resolution of your screen. If there is not enough space to show the button for a given action, then the action will be available from the menu instead. If you are unsure what a button does, you can long-tap on it to see the name of the action. The following action are available:
- Undo
-
Undo the answer you chose for the last card you studied (button always shown).
- Mark Card
-
Adds a "marked" tag to the current note, so it can be easily found in the browser. This is useful when you want to take some action on the note at a later date, such as looking up a word when you get home. Marked cards also show a small star in the upper-right-hand corner during reviews.
- Flag Card
-
Adds a color coded "flag" (red, orange, green, or blue) This can be used as a general purpose indicator to differentiate your cards. Flags are represented by a number from 1-4, corresponding to the previously listed colors.
- Edit Card
-
Open the edit note screen, where you can change the content displayed on the flashcard (see the editing notes section for more help)
- Hide / Delete
-
Give options to bury, suspend, or delete the current note or card
-
Bury card / Bury note: Hides a card or all of the note’s cards from review until the next day. (If you want to unbury cards before then, you can choose “unbury” from the long-press menu in the deck list, or from the deck overview screen.) This is useful if you cannot answer the card at the moment or you want to come back to it another time. Burying can also happen automatically for cards of the same note.
-
Suspend card / Suspend note: Hides a card or all of the note’s cards from review until they are manually unsuspended (by long-tapping a card in the card browser). This is useful if you want to avoid reviewing the note for some time, but don’t want to delete it.
-
Delete note: Deletes the note and all of its cards.
-
- Replay Audio
-
If the card has audio on the front or back, it will be played again.
- Enable / Disable Whiteboard
-
This action enables or disables the whiteboard feature for the current deck. The whiteboard feature allows you to draw on the screen, which is particularly useful for practicing drawing characters from languages such as Japanese. When the whiteboard has been enabled for the current deck, two new actions will become available for clearing and hiding the whiteboard. Disabling the whiteboard will hide these actions as well as the whiteboard itself.
- Deck options
-
Open the deck specific study options. See the desktop documentation for more information about these study options.
- Check Pronunciation
-
This action enables or disables the temporary audio recorder toolbar at the top of the card. This feature allows you to record your voice and replay it. It is used primarily to check your pronunciation. This toolbar is composed of three buttons: play, stop playing and record microphone audio. This tool can be used while viewing either the question or the answer.
Reaching the end of the study session
When you’ve finished the cards that are due to be studied today, you’ll be taken back to the decks list and shown a congratulations message. From here you can select a different deck, or if you’ve finished studying for the day, you can simply tap the home button in order to close AnkiDroid (and you can also do this in the middle of reviews if you wish).
If you wish to keep studying the same deck further, tap on the deck again which will give you several options for continued study. Please see the filtered deck section for more on custom study.
Add Note Screen
Note: This section onwards assumes you understand what notes, fields, card templates, and note types are
To add a new note, tap the + button at the bottom of the deck list and choose "Add".
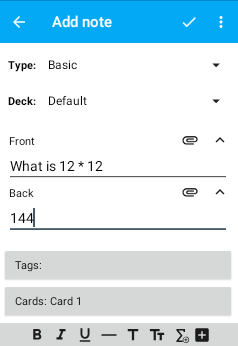
The following controls are available in the add note screen:
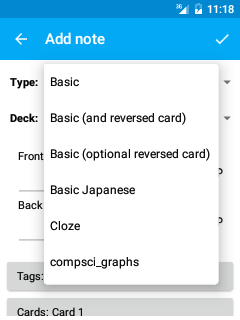
- Type
-
Allows you to select the type of note you’d like to add. For most purposes the "Basic" note type is sufficient, but for example if you would like an extra card generated which is the reverse of the main card (i.e. shows the "Back" field on the front of the card), you could chose the "Basic (and reversed card)" note type.
- Deck
-
Allows you to change the deck the generated card/cards will be added to.
- Fields
-
Below the deck selector are the fields for the note (for example the "Basic" note type has two fields "Front" and "Back"). When you tap on a field, a keyboard will come up, allowing you to type in information.
- Media Buttons
-
Next to each field is an attach icon, which allows you to add media to your note (this feature is currently in the experimental phase). Add image lets you add images either via your device’s camera (if it has one), or from your photo library. Record audio allows you to record your voice and place it into a field. The advanced editor lets you automatically search for translations or pronunciation audio files online.
- Tags
-
Brings up a dialog which lets you add / remove tags from the note.
- Cards
-
Shows the names of the cards which will be generated for the selected note type. Tapping on this button will bring up a dialog which lets you preview the source code for the card template of the selected note type. From here you can edit, preview, add, and delete card templates. See the cards and templates section of the Anki Desktop manual for more information about card templates.
Long press in a text entry field to add a cloze deletion around the selected text, or an empty cloze deletion if there is no selected text.
When you’ve finished typing in the content of a note, tap the tick icon in the app bar at the top to add it to your collection. Alternatively, if you want to go back to what you were doing without saving, you can tap the app icon, or use the hardware back button.
Note Formatting Toolbar
The note formatting toolbar contains basic text formatting buttons (Bold, Italic, Underline, Horizontal Line, Insert Title, Change Font Size, Insert MathJax and Insert Cloze Deletion).
It also allows the addition of user-defined toolbar buttons using HTML. HTML is a powerful language allowing nearly endless customization of your cards. Our wiki contains common code samples to get you started.
A user-defined toolbar button can be removed by long pressing the button and selecting "Delete".
Edit Note Screen
The edit note screen can be opened by choosing edit while reviewing, or by opening a card in the browser. The edit screen is similar to the add new note screen mentioned above, with some key differences:
-
Changing the deck operates on the selected card (which is underlined in the "Cards" box). If a note type is chosen which has more than one card, only the currently selected card will be moved to the new deck.
-
Changing the "Type" dropdown selector changes to the note type edit mode. In this mode, editing the content of the note (i.e. deck, fields, etc) is disabled, and if a custom note type with more than two fields is being used, additional buttons will appear which let you control the mapping of the fields to the new note type.
If a note type is selected which has less cards than the original note type, only the first n cards will be kept. For example changing from "Basic (and reversed card)" to "Basic" will lead to only the first card being kept. To warn you of this, the text in the "Cards" box will appear red, and a confirmation dialog will be shown before the note is saved.
Hint: to change the type for multiple notes in one go, or to customize the mapping between cards, use the "Change note type" option in the browser on Anki Desktop.
There are also several advanced options available in the main menu:
- Add note
-
Create a new empty note
- Copy card
-
Copy the current note to a new editable note
- Reset progress
-
Move the card to the end of the new card queue. The current state of the card is cleared, but not its revision history.
- Reschedule
-
Allows you to reschedule as a review card on a given date. This is useful if you have imported already-learnt material, and you want to start it off with higher initial intervals.
Finding/Searching/Browsing
You can search for or browse cards by tapping the "Card browser" button from the navigation drawer.
The browser screen starts by displaying all the cards in the currently selected deck. You can search for cards in the selected deck by tapping the magnifying glass icon in the top. You can change the selected deck (or change to all decks) by choosing the deck from the dropdown list on the top left.
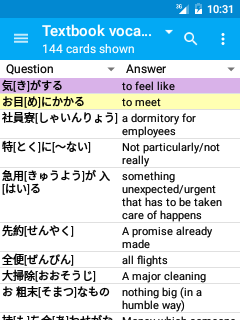
By default, the first column in the browser gives the text which will be shown on the question (i.e. front side) of the flashcard, and the second column shows the text from the answer (i.e. the back side) of the flashcard.
The first column can also be configured to show the "sort field" for a more compact display. The second column can be configured to show many different parameters by tapping the drop down menu in the column heading.
Note that the content of the columns is dynamically calculated as your scroll through the list of the cards.
From the search results, you can tap on a card to edit it (see the edit note section above), or long-tapping on it will show a menu allowing you to perform the following actions:
- Mark / unmark note
-
Add / remove the "marked" tag from the note. Cards with a marked note are highlighted in purple.
- Flag card
-
Change or remove the color coded "flag" on the card. Cards with a flag are highlighted in the flags color.
- Suspend / unsuspend card
-
Suspended cards are highlighted in yellow, and are not shown during review.
- Delete note
-
Delete the note of the currently selected card, and all cards belonging to that note. This action cannot be undone without restoring from backup.
- Preview
-
Render the currently selected card so that you can see what it looks like in the study screen.
- Select multiple cards
-
Long-tapping on a single card will select the single card. While that card is selected, if you long-tap on another card on your screen, then all of the cards between the first selected card and the last card will be selected. This allows for actions to be performed on multiple cards at once.
Searching
AnkiDroid supports all the search strings that the desktop version of Anki does, allowing you to perform quite complex searches. Some examples:
- tag:marked
-
show cards that with the tag "marked"
- is:due
-
show only cards that are waiting for review
- front:rabbit
-
show only cards where the front field is exactly "rabbit"
- flag:1
-
show only cards marked with a red flag
For a full list of the possibilities, please see the section in the desktop manual.
Alternatively, some more commonly used filters (marked, suspended, and tagged cards) can be quickly applied without manually typing them by choosing them from the overflow menu. You can also save and recall common search queries from the menu.
Filtered Decks
Anki is designed to optimize the learning process, so that you study the minimum amount necessary to remember the majority of your cards. Once the congratulations screen is reached, further study becomes a case of diminishing returns: the amount of extra time spent going over the same cards again is generally not worth the moderate increase in retention you’ll see.
That said, if you have a test looming, or simply want to pass some time, it’s possible to keep reviewing even after you are shown the congratulations message.
A 'filtered deck' is a temporary deck that contains cards based on various criteria, such as "forgotten today", "is tagged 'hard'", and so on. After studying cards in a filtered deck, or when the filtered deck is deleted, the cards are automatically returned to their original deck.
The easiest way to create a filtered deck is by long clicking on a deck and choosing the "custom study" option.
Advanced users can create a filtered deck manually, by choosing "Create filtered deck" from the "+" button in the deck list screen.
For further information on filtered decks, please see the desktop documentation.
Using Right-To-Left Languages with AnkiDroid
Anki and AnkiDroid have full support for RTL languages such as Arabic, Hebrew, and Persian.
Editing Fields as RTL
Fields can be marked as RTL (currently possible only from Anki Desktop) for RTL editing. When a field is marked as RTL, then the text is right-aligned in editing fields and punctuation is correctly displayed at the end (left) of sentences. Text that contains blocks of LTR characters will be properly displayed as well, with the beginning of the sentence appearing to the right of the LTR block and the end of the sentence being displayed to the left of the LTR block.
Directionality is especially important for editing and creating RTL cloze deletions as the cloze format includes both neutral and LTR markup characters. Therefore it is recommended to use a separate note type for LTR cloze deletions and RTL cloze deletions.
Using Anki Desktop with AnkiDroid
Anki has a free cloud synchronization service called AnkiWeb that makes it easy to keep your card decks in sync between mobile devices and your computer. If you cannot use sync for some reason, it’s also possible to use USB, though this method is more laborious.
Note that AnkiDroid is not affiliated with Anki Desktop or AnkiWeb. AnkiDroid is based on Anki Desktop but it is developed by an entirely separate community of volunteers.

Via Cloud Sync
Before you can use AnkiWeb, you’ll first need to create an account by visiting https://ankiweb.net and clicking the Sign Up button. If you have used AnkiWeb in the past, you can skip this step. After signing up, see the corresponding instructions below, depending on whether you are trying to get your existing decks into AnkiDroid or out of AnkiDroid.
Sync existing decks into a new AnkiDroid install
In this scenario you have some existing Anki decks that you want to copy into a new install of AnkiDroid by syncing with AnkiWeb. Open the Anki client with your existing decks (usually this would be Anki desktop, but it could also mean a version of AnkiDroid you have been using on another device), and click the synchronization button (which has two arrows in a circle) at the top right of the deck list.
If you have never used AnkiWeb before you will need to enter your credentials if prompted, and then press the "Upload to AnkiWeb" button to confirm overwriting the empty collection on AnkiWeb with your existing decks in Anki. Anki will upload all your cards, images and audio to AnkiWeb. If you have a lot of media, this may take some time.
Once the synchronization has completed, open AnkiDroid in the device that you are trying to copy the existing decks into, and tap the Sync button in the app bar at the top of the main deck list. After entering your AnkiWeb credentials, AnkiDroid will download all your cards and media, and remember your login information for next time.
Note that if you have any existing material in AnkiDroid before attempting to sync, you may be shown a message asking you to choose to either download from AnkiWeb, or upload to AnkiWeb. If you are happy to lose the cards in AnkiDroid then simply choose Download. If you need to merge the existing cards with AnkiDroid then you should see the resolving conflicts section before continuing.
After the first synchronization has completed, you can click the sync button again any time you wish to synchronize your changes to the cloud. Only changes made since the previous sync will be sent, so subsequent syncs are a lot faster.
If you add some new cards on the desktop computer and want to sync them to AnkiDroid, you’d repeat the same basic process: sync on desktop (or close the program, as it syncs automatically on close by default), and then tap the sync button on AnkiDroid.
Sync from AnkiDroid to Computer
The process of syncing from AnkiDroid to computer is essentially the same as syncing from computer to AnkiDroid, but in reverse.
From the deck list, tap the sync button in the top right (it has two arrows in a circle). If it’s your first time using AnkiWeb, you may need to enter your login credentials, and then press the "upload" button to upload your AnkiDroid collection to AnkiWeb.
Once the synchronization has completed, open Anki Desktop on your computer and press the sync button there (with two arrows in a circle), and Anki will download your collection.
Dealing with merge conflicts on AnkiWeb
Although it should not happen often, occasionally you may end up in the position where your cards on AnkiDroid can not be automatically merged with the cards on AnkiWeb. In this case it’s necessary to choose to either upload to or download from AnkiWeb, which would overwrite any changes on the other side. Once the conflict is resolved, syncing will work as usual.
To be precise:
-
Press the "AnkiWeb" button to replace decks here with AnkiWeb’s version, and you will lose any changes made on your AnkiDroid device since last sync.
-
Press the "AnkiDroid" button to overwrite AnkiWeb’s versions with decks from the AnkiDroid device, and delete any changes on AnkiWeb.
If you have new cards on both sides which you want to keep, before syncing you can export a deck package for each deck containing new cards from AnkiDroid, then when you do the sync choose "download" to download from AnkiWeb. After the synchronization has completed, you can import the decks you previously exported from AnkiDroid, as per the importing section.
For any remaining questions, more detail can be found in the Conflicts section of AnkiWeb Manual.
Custom Sync Server
Advanced users can run their own Anki sync server and then connect to it from AnkiDroid. See the Self-Hosted Sync Server in the Anki Manual. Note that this is not an AnkiDroid but an Anki feature and is only mentioned here for user convenience.
Via USB
If you don’t have regular internet access, it’s still possible to copy decks back and forth to your device, by using USB.
The USB method works by importing or exporting all your decks at once. This means that unlike syncing via AnkiWeb, you can’t make changes from two locations at once and then merge them. Instead, if you wish to add cards on the desktop, you need to make sure you export the latest version of your collection from your mobile device first, or you’ll end up losing any reviews done on the mobile device.
Thus the workflow you would typically use is to export your collection from your mobile device and import it into the desktop, make modifications on the desktop, and then export your collection and import it back into your mobile device.
AnkiDroid can’t directly import text files. If you wish to do that, you’ll need to do that with the desktop program, and then import your collection into AnkiDroid.
Copy all decks from Anki Desktop to AnkiDroid via USB
On your computer:
-
Open the desktop program.
-
Choose File>Export from the menu.
-
Click the 'Export…' button. Make sure to leave "all decks" selected, as it’s not possible to import individual decks into AnkiDroid. "Include scheduling information" must also remain checked.
-
Anki will automatically create a collection.apkg on your desktop. If the file is named something else, please see the previous step again.
-
Connect your Android device to your computer via the USB cable.
-
Open the file explorer on your computer and view the contents of your Android device.
-
Locate the AnkiDroid folder.
-
Drag the collection.apkg file from your desktop into this AnkiDroid folder.
Then in AnkiDroid:
-
From the main decks screen, tap "Import file" from the menu
-
Tap on "Collection" and then confirm
Once complete, the decks on your device will have been replaced with the decks from your desktop. See the section on importing apkg files for more help with importing.
Copy all decks from AnkiDroid to Anki Desktop via USB
The process to copy your decks from AnkiDroid to Anki Desktop is essentially the same as above, but in reverse.
-
Start with your device disconnected from USB
-
Choose "Export collection" from the main menu in the Deck Screen
-
Ensure "Include scheduling information" remains checked and press OK
-
Connect device to computer using USB
-
Copy the "collection.apkg" from the path specified in the message to the desktop on your computer
-
Double click on the file to import into Anki Desktop
See the exporting section below for more detailed information on exporting from AnkiDroid.
Importing Anki Files
You can import Anki files (with .apkg file format) directly into AnkiDroid. Other file formats cannot be imported directly into AnkiDroid, however flashcards from most other applications can be imported into Anki Desktop on your computer, which can then be added into AnkiDroid in the usual way. See the importing section of the Anki Desktop manual for help on importing into Anki Desktop.
As in Anki Desktop, AnkiDroid distinguishes between the two types of .apkg files ("collection package" and "deck package") based on the filename. Collection packages have the name "collection.colpkg", and when imported will completely replace all contents in AnkiDroid. Any apkg file which is *not* named something that ends in ".colpkg" will be treated as a deck package, which will be merged with any existing content when imported into to AnkiDroid.
You can import .apkg Anki collection files into AnkiDroid either by opening them using the standard Android system, or by manually importing them from within AnkiDroid:
Open the file using Android
Apkg files are automatically associated with AnkiDroid, so for example if you open a .apkg email attachment which you sent to yourself, then AnkiDroid will automatically open the file and confirm if you want to import it. Simply click OK and the apkg file will be imported.
Import the file manually in AnkiDroid
You can also manually import .apkg files as follows:
-
Connect your device to your computer using USB
-
Copy the .apkg from your computer to the AnkiDroid folder on your device
-
Open AnkiDroid on your device
-
From the main menu in the deck list, choose Import
-
Choose the apkg file you just copied to your device when prompted
-
Tap OK
Importing Anki Databases (.anki2)
AnkiDroid does not support directly importing Anki database (.anki2) files. A database import will replace your collection with the contents the provided file. If you want to perform a full replacement, you should import a collection[.apkg/.colpkg] created in the app with the export function.
Importing anki2 files manually
This is not officially supported, but .anki2 files can manually be imported if needed, in cases of troubleshooting for example:
-
Create a new folder on your Android file system
-
Obtain the full path to the folder as provided by your file manager, this will typically appear as:
/storage/emulated/0/<FolderName> -
Place the
.anki2file in the newly created folder -
Rename the file to
collection.anki2 -
(If applicable) Temporarily log out of your AnkiWeb account:
Settings - AnkiDroid - AnkiWeb account -
Open
Settings - Advanced - AnkiDroid Directoryand set the AnkiDroid Directory to the newly created folder.
Exporting Anki Files
AnkiDroid can export your flashcards in the .apkg Anki file format so that you can import them into Anki Desktop, or share them with other people. As in Anki Desktop, you can either export a collection package or deck package, depending on what you are trying to achieve.
There are two export options available: "include scheduling information" and "include media". Generally the default options are sufficient, if you choose not to include scheduling information, Anki will assume that you are sharing the deck with other people, and will remove marked and leech tags so that they will have a clean copy of it.
Exporting collection package
When exporting for use in Anki Desktop, you generally want to export your entire collection, including all your review history etc.
From the main menu in the decks screen:
-
Tap the Export item in the menu.
-
Tap OK using default options
-
Tap OK again to email the exported collection.apkg file to yourself, or alternatively you can manually copy to your computer using USB
To import the file on your computer:
-
Save the file "collection.apkg" to your desktop
-
Double-click on the file to start Anki.
-
Confirm you wish to replace, so that the deck from your mobile device overwrites the old data on your desktop.
-
After importing, you can delete the apkg file on your desktop if you wish.
Automatic Backups
AnkiDroid will automatically create backups of your collection for you. The backups include all your cards and statistics, but do not include sounds or images.
The backup is taken in the background when you first start the app. A backup will only happen if more than 5 hours has elapsed since the last time a backup was created. By default, AnkiDroid will store the last 8 backups; this number can be changed in the main settings.
You can restore a backup by choosing the restore from backup option from the main menu of the decks screen.
Preferences
The preferences screen can be accessed by opening the navigation drawer, and choosing "Settings". It allows you to customize various application settings and how AnkiDroid appears.
The Preferences screen is divided up into different sections, which are covered below.
AnkiDroid
These are the general settings which affect the whole app:
- AnkiWeb account
-
Change the account used for syncing with the cloud. For more information on syncing, please see this section.
- Fetch media on sync
-
By default, AnkiDroid will sync sounds and images as well as your cards and review history. If you disable this option, sounds and images will not be downloaded from or uploaded to the sync server by AnkiDroid.
- Automatic synchronization
-
Enable this option if you want AnkiDroid to sync every time you open and close the app. There is a limit of once every ten minutes for this behavior. Once a sync begins you can cancel it by pressing your device’s back button, however it can take some time for the cancellation to take effect.
Users that want more fine-grained control over when sync occurred might like to use a 3rd party app like Tasker to automate synchronization. See the API documentation for more information on this.
- Deck for new cards
-
The default of "Use current deck" means that Anki saves the last-used note type for each deck and selects it again then next time you choose the deck (and, in addition, will start with the current deck selected when choosing Add from anywhere). The other option, "Decide by note type," saves the last-used deck for each note type (and opens the add window to the last-used note type when you choose Add). This may be more convenient if you always use a single note type for each deck.
- Language
-
Change the language. Note: AnkiDroid translations are contributed by volunteers. If you find missing or incorrect translations, feel free to contribute to the translation project. More details can be found on the AnkiDroid Wiki.
- Error reporting mode
-
Control whether or not AnkiDroid asks your permission before sending error reports to our error reporting system when AnkiDroid crashes. You can also disable the reporting feature entirely if you wish.
Notifications
This subsection allows you configure when and how AnkiDroid shows alerts in the Android notification bar.
- Notify when
-
Never notify will disable all notifications from AnkiDroid. Pending messages available will only show important status updates like when a sync completed. More than n cards due will show a notification when you have more than n cards due (requires the widget to be enabled).
- Vibrate
-
Checking this will make your device vibrate when showing a notification
- Blink light
-
Checking this will make your device light blink when an unread notification exists (if your device has a notification LED)
Reviewing
The reviewing screen allows you to customize how AnkiDroid behaves when you’re reviewing cards. Note that only the reviewing settings which are applied to all decks are shown here. There are more settings related to reviewing which are deck specific. These deck specific settings are located in Deck options.
- New card position
-
Controls when new cards are shown: either mixed with, after, or before all reviews.
- Start of next day
-
Controls when AnkiDroid should start showing the next day’s cards. The default setting of 4AM ensures that if you’re studying around midnight, you won’t have two days worth of cards shown to you in one session. If you stay up very late or wake up very early, you may want to adjust this to a time you’re usually sleeping.
- Learn ahead limit
-
The Learn ahead limit tells AnkiDroid how to behave when there is nothing left to study in the current deck but cards in learning. The default setting of 20 minutes tells AnkiDroid that cards should be shown early if they are due to be shown in less than 20 minutes and there’s nothing else to do. If you set this to 0, Anki will always wait the full period, showing the congratulations screen until the remaining cards are ready to be reviewed.
- Timebox limit
-
Timeboxing is a technique to help you focus by dividing a longer activity (such as a 30 minute study session) into smaller blocks. If you set the timebox time limit to a non-zero number of minutes, AnkiDroid will periodically show a message saying you how many cards you’ve managed to study during the prescribed time limit.
Display
This subsection relates to the way cards are displayed during reviewing
- Keep screen on
-
Ignore the automatic screen timeout setting in Android to always keep the screen on.
- Fullscreen mode
-
Switches to an immersive fullscreen mode so that you can use more of the screen. You can choose between "Hide the system bars" which will hide the system status bar, action bar, and bottom navigation buttons. Alternatively you can choose "Hide the system bars and answer buttons", which will hide everything except for the actual card content itself. You can temporarily exit fullscreen mode by swiping inwards (i.e. down or up) from the system bars.
Note that immersive fullscreen mode is only supported on Android 4.4+
- Center align
-
By default AnkiDroid tries to show cards exactly as they are shown on Anki Desktop, however if you prefer your cards to be center aligned vertically in AnkiDroid then you can enable this feature.
- Show button time
-
By default, the answer buttons will display the time a card will next be shown. If you disable this option, the times will not appear, and only labels like "Again", "Good" and "Easy" will be shown.
- Card zoom
-
Here you can increase the zoom level of the card content (excluding images). You can use this option if you want to increase the font size for all cards.
- Image zoom
-
Here you can increase the zoom level of any images embedded in your cards.
- Answer button size
-
If you find it difficult to press the answer button, you can use this setting to make it bigger.
- Show remaining
-
Disabling this allows you to hide the card count in the top left of the screen.
Whiteboard
This subsection controls the whiteboard in the study screen. Note: the whiteboard must be enabled in each deck individually from the menu in the study screen.
- Stroke width
-
Control the stroke width of the whiteboard. Reducing the stroke width may allow you to draw with more detail.
- Black strokes
-
Use black strokes instead of color, which may reduce memory usage. Note: this setting doesn’t apply when night mode is enabled.
Automatic display answer
The automatic display answer feature allows you to have the answer shown automatically after some timeout period. You can also have the next question shown automatically; in this case the card is assumed to be failed (i.e. the again button is automatically chosen)
- Time to show answer
-
Time to wait until answer is automatically shown
- Time to show next question
-
Time to wait until next question is automatically shown.
Gestures
AnkiDroid allows you to customize the interface, so that actions you perform frequently can be accomplished quickly by using tap and swipe gestures.
Actions
The following gestures can be used:
-
Swipe up
-
Swipe down
-
Swipe left
-
Swipe right
-
Double touch
-
Touch top
-
Touch bottom
-
Touch left
-
Tough right
The following actions are available for each gesture:
- No action
-
Don’t do anything. Useful if you want to disable certain swipes, tap zones and so on.
- Answer button 1
-
When the answer screen is shown, choose the red button, indicating you wish to review the card again soon. This is useful when you forgot a card or wish to review it more frequently. When the question is shown, this action (and all other answer actions below) will simply show the answer.
- Answer button 2
-
When the answer screen is shown, choose the second button from the left, generally indicating you found the card hard to remember.
- Answer button 3
-
When the answer screen is shown, choose the third button from the left.
- Answer button 4
-
When the answer screen is shown, choose the fourth button from the left (when applicable).
- Undo
-
Undoes the last action.
- Edit card
-
Edits the current card.
- Mark
-
Adds a tag called "Marked" the current note, so it can be easily found in a search.
- Bury card
-
Hides the current card from review.
- Suspend card
-
Prevent current card from being shown during review until you unsuspend it via the card browser.
- Delete note
-
Deletes the currently shown note and all of its cards.
- Play media
-
Replay any audio on the card.
- Abort learning
-
Stop reviewing and go back to the deck overview page.
- Bury note
-
Bury the current note (i.e. hide it until the next day).
- Suspend note
-
Suspend the current note (i.e. hide it until you unsuspend it).
- Toggle Red Flag
-
Enables the red flag, unless the flag is already red, in which case the flag is disabled.
- Toggle Orange Flag
-
Enables the orange flag, unless the flag is already orange, in which case the flag is disabled.
- Toggle Green Flag
-
Enables the green flag, unless the flag is already green, in which case the flag is disabled.
- Toggle Blue Flag
-
Enables the blue flag, unless the flag is already blue, in which case the flag is disabled.
- Remove Flag
-
Removes the flag from the card.
User Actions
|
Warning
|
JavaScript is an advanced feature. Official user support is not provided and AnkiDroid updates may break functionality |
User actions allow you to execute JavaScript in the study screen.
A custom card template, produced by you or a deck
developer can define JavaScript functions. AnkiDroid can run up to 9 of these functions by assigning them to the
variables: userJs1…userJs9.
The template below defines User Action 1 and User Action 9.
{{Front}}

<script>
function helloWorld() {
    document.writeln("hello world,");
}

var userJs1 = helloWorld;
var userJs9 = () => document.writeln("hello AnkiDroid,");
</script>
Advanced
Some less common features for advanced users are shown here
- Collection path
-
Change the location where AnkiDroid’s data is stored (not recommended)
- Force full sync
-
Tap this item to force a full upload or download on the next sync (for example, because you accidentally deleted a deck on one side and want to restore the deck rather than having its deletion synchronized).
Workarounds
- Type answer into the card
-
If you have set up your cards to ask you to type in the answer (as explained in this section of the desktop manual), AnkiDroid will display a keyboard on such cards and allow you to check your answer.
In order to improve user experience when working with the whiteboard and gestures, we use a typing box separate from the card, which is inconsistent with the way the feature works on Anki Desktop.
For full consistency with Anki Desktop, you can enable this option which allows you to save screen area, and choose an appropriate font (e.g. Japanese vs Chinese) for the input box.
- Input Workaround
-
Some older devices couldn’t gain focus into the text input box for typed-answer fields, so this was added (Hidden for API > 14).
- Longclick Workaround
-
Some older devices couldn’t detect longclick for initiating selecting/copying of text, so this was added (Hidden for API > 10).
- Fix for Hebrew Vowels
-
Some older devices couldn’t render Hebrew text, so this feature was added which allows the user to download and install a Hebrew font which is known to work (Hidden for API > 15).
- Text to Speech
-
Enable this option to have Android read out all the text on your flashcards using the default text to speech engine. Google’s built-in TTS engine should work; 3rd party TTS engines may or may not. AnkiDroid will ask you to select the language for the front and back of your cards once for each deck on the first time you review a card in that deck. To change the language or disable TTS for a given deck after making your initial choice, you’ll need to use the "reset languages" option described below and reconfigure for each deck.
Alternatively, if you want only fragments of cards to be read aloud, or if you want to set the TTS language for multiple decks at once, you can insert
<tts>tags into card templates. For example, with the following template for the back of the card{{FrontSide}} <hr id=answer> <tts service="android" voice="en_GB">{{EnglishTranslation}}</tts> <br><br> {{Example}}only the
EnglishTranslationfield will be read aloud in a British English voice; theExamplefield, lying outside the<tts>tag, won’t be read aloud. Every<tts>tag needs to have the following two attributes:-
service: should be set to"android", otherwise the contents of the<tts>tag won’t be read aloud; -
voice: used to select the TTS language; should be a two- or three- letter language code, optionally followed by an underscore and a two-letter country or region code. A frequently updated list of languages supported by the Google TTS engine can be found on its Wikipedia page.
To make both AnkiDroid and the AwesomeTTS plugin to the desktop application use a TTS engine to read aloud certain card fragments, put the
<tts service="android" …>tag inside the<tts>tag recognised by AwesomeTTS, or vice versa. An example:<tts service="sapi5js" quality="39" speed="0" voice="Microsoft David Desktop" volume="100" xml="0"> <tts service="android" voice="en_GB"> {{EnglishTranslation}} </tts> </tts>AnkiDroid automatically ignores
<tts>tags selecting an unknown TTS service. In contrast, AwesomeTTS may display a warning message on encountering the<tts service="android" …>tag; to suppress it, uncheck the two Show errors checkboxes on the Playback tab of the AwesomeTTS: Configuration dialog in the desktop application.This feature may be removed in the future in favor of a separately downloadable plugin
-
- Reset Languages
-
Useful for resetting the TTS language
- eReader (up/down buttons)
-
Support for eReader hardware buttons (see issue 1625)
This feature will likely be removed in the future in favor of a plugin
- eReader Double Scrolling
-
Double the scrolling distance when using the eReader hardware buttons
Advanced Features
MathJax Support
Mathjax is a modern typesetting library for math and chemistry. AnkiDroid supports Mathjax cards out of the box. Mathjax is configured to expect TeX formatting, with \( and \) delimiting inline equations and \[ and \] for display equations.
To try it out, enter the following into a field:
… \(\sqrt{x}\) …
and preview the card.
For more details, see Mathjax Support in the Anki Manual.
Previous workarounds are no longer necessary as of AnkiDroid 2.9.
Reverse Cards
The Anki system has built-in note types which allow you to review cards in both directions. When creating new material in AnkiDroid, you should choose one of these note types, such as "Basic (and reversed card)", which will automatically generate a reverse card for you.
If you used the wrong note type when adding your material, you can change the note type via the edit note screen, or you can change the note type for multiple cards at once using the browser in Anki Desktop. To do this, follow the instructions in the syncing with Anki Desktop section, then in Anki Desktop open the browser, select the cards you want to change, then choose Change note type from the menu.
Alternatively, if your cards are using a custom card layout which doesn’t include a reverse card, you can edit the note type to include a reverse card by following the instructions in the reverse cards section of the Anki Desktop user manual. While less convenient than using Anki Desktop, it is possible to edit the note type from directly within AnkiDroid as well; see the custom card layout section for more on this.
Custom Fonts
AnkiDroid allows you to use non-system fonts on your cards. To set them up properly, it is strongly recommended to use the official method that is used by Anki Desktop. Please see the corresponding section in the desktop manual for more information.
Please note that AnkiDroid has to load the entire font into memory in order to use it, and fonts for Asian languages can be quite large. If you have an older device and notice AnkiDroid crashing frequently after installing a font, you may have exceeded your device’s memory limits. For Google Noto, it’s not recommended to use the combined CJK font, rather get the individual languages separately from here.
Note 1: If you have "Fetch media on sync" disabled, you may need to manually copy the font file from Anki Desktop to your AnkiDroid/collection.media folder.
Note 2: If you can’t get your font to work after following the steps in here and the Anki Desktop manual, please refer to the FAQ for detailed steps on how to debug font issues.
Custom Card Layout
The layout of flashcards is completely customizable, although this is an advanced topic with a fairly steep learning curve, and you will probably find it a lot more convenient to do the customization with Anki Desktop.
The card templates section of the Anki Desktop manual has detailed instructions on how to edit note types, and most of the actions discussed there are also available from AnkiDroid by tapping "cards" at the bottom of the note editor, or choosing the "manage note types" option in the deck picker. Since detailed information on customizing card layouts is available in the Anki desktop manual, it will not be repeated here.
There is an advanced formatting page on the AnkiDroid wiki with various hints on how you can get the most out of your card formatting, and we encourage you to read it, and edit it freely if you have any tips that you’d like to share with the community.
Type in the answer feature
AnkiDroid allows you to type in the correct answer and then compare it to the right answer. You have to set this up with Anki desktop, as described in the Anki Desktop manual.
Anki desktop replaces the “{{type:NN}}” field on the front of a card with an input box in the card. On AnkiDroid it is replaced with a “……” prompt instead, and a text input box is shown at the bottom. The comparison between typed text and the correct text is shown on the answer side in place of the “{{type:NN}}” field there, like on Anki desktop.
The text input box and the soft keyboard can be hidden by ticking “Disable typing in answer” in the preferences.
Even with typing disabled, the correct answer is shown on the answer side. This is done on purpose; otherwise the correct answer might not be shown at all.
To hide the comparison (e.g. because the correct answer is shown anyway), the HTML id “typeans” can be used. Add “.mobile #typeans {display: none;}” to the card styling using Anki Desktop.
The type answer prompt and the comparison have more classes that can be used to change the way they are displayed. Some of these are the same as on Anki Desktop, some are specific to AnkiDroid.
The comparison uses three classes, typeGood, typeBad and typeMissed to add green, red and gray background to the typing comparison. These three classes are used on Anki desktop as well.
The “……” prompt has the class “typePrompt”.
When typing is set to off in the preferences, the class “typeOff” is added to the prompt on the question side, and to the div element containing the comparison on the answer side. This class can be used to show the type prompt or to hide the typing comparison in this case.
Automatic Language Selection
AnkiDroid has an in Automatic Language Selection feature in the Note Editor starting with AnkiDroid 2.13. This feature allows you to define a default language to be used in your keyboard for a field in a note type.
For example, if you have Russian and English note fields, and your keyboard supports the setImeHintLocales Android API, the keyboard layout will switch to Russian in the first field and back to English in the second automatically when the fields get focus. Checkout video reference for demonstration
Keyboard Shortcuts
Study Screen
| Shortcut | Purpose |
|---|---|
1,2,3,4 |
Press the nth answer button |
Gamepad Y |
Flip Card/Press the first answer button |
Gamepad X |
Flip Card/Press the second answer button |
Gamepad B |
Flip Card/Press the third answer button |
Gamepad A |
Flip Card/Press the fourth answer button |
Space,Enter |
Flip Card/Answer Good |
e |
Edit Note |
* |
Mark Note |
- |
Bury Card |
= |
Bury Note |
@ |
Suspend Card |
! |
Suspend Note |
r,F5 |
Replay Media |
z |
Undo |
Note Editor
| Shortcut | Purpose |
|---|---|
Ctrl+Enter |
Save Note |
D |
Select Deck |
L |
Card Template Editor |
N |
Select Note Type |
T |
Edit Tags |
Ctrl+P |
Preview Note |
Ctrl+B |
Bold |
Ctrl+I |
Italic |
Ctrl+U |
Underline |
Ctrl+R |
Insert Horizontal Rule |
Ctrl+H |
Insert Title |
Ctrl+F |
Change Font Size |
Ctrl+M |
Insert MathJax Equation |
Ctrl+Shift+C |
Insert New Cloze Deletion |
Ctrl+Alt+Shift+C |
Insert Cloze Deletion using existing number |
Ctrl+1..0 |
Insert User-Defined HTML |
Beta testing
If you want to try out the latest features in AnkiDroid, you can sign up for the beta testing program as follows:
-
Visit the Google Play Beta page
-
Click Become a beta tester
After following these steps, the latest beta version will automatically be installed by Google Play in the same way as ordinary updates.
Please submit any bugs you find in these development versions to the AnkiDroid issue tracker, as per the main help page.
If you wish to leave the testing program at any time, simply visit the Google Play Beta page and click Leave the test
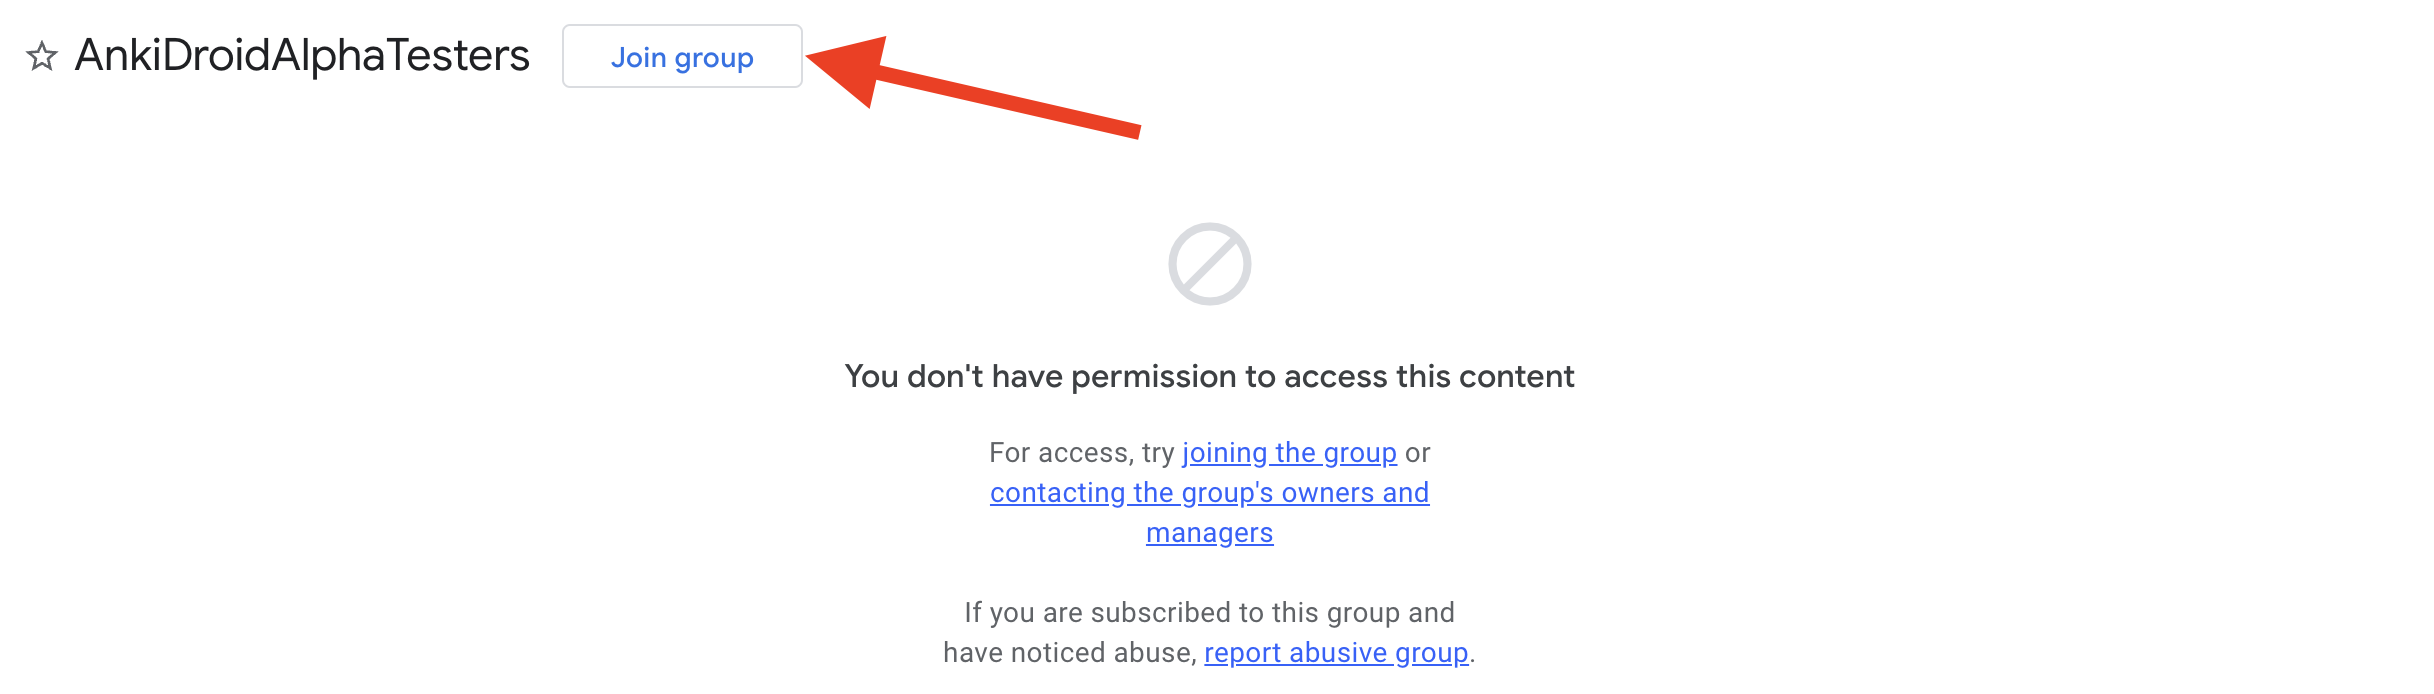
Alpha testing
If you are more adventurous, you can also become an alpha tester, by joining the alpha testers group in addition to performing the above steps for beta testing.
Contributing to AnkiDroid
AnkiDroid is an open source project, and its development relies on contributions from volunteers. Here are some of the ways you can contribute to the AnkiDroid project:
- Get involved
-
Rate the app, join the AnkiDroid forum and answer questions for other users, submit bug reports, become a beta tester, etc. More detailed information on ways you can contribute as a non-developer can be found on the Wiki.
- Translate
-
Translations of AnkiDroid and this user manual are all contributed by users, and are greatly appreciated. See the translating wiki page for detailed instructions on how to contribute translations.
- Develop
-
The source code for AnkiDroid is available on our main Github page, and bug fixes as well as new features are very welcome. Before investing a lot of time on working on a new feature, you may like to ask on the forum first if it’s likely to be merged into the main project, as not all features will be accepted. If you are just getting started with Android programming, feel free to ask on the forum for some tips and/or tasks which are suitable for beginners.